 Preslav Rachev
The iPad can be a fantastic companion for productivity and creativity. It can also be your biggest source of distraction. Often, at the same time. The reason is that the iPad offers a lot more power than we need at times. Modern iPads are far from the toy-like devices they once were. In fact, if we talk about the iPad Pro, hardware-wise, it is indistinguishable from the Mac. Add to that the ability that you can carry it with you, and you get a recipe for disaster - staying hooked on content all day long.
There were many things I did not like about the reMarkable, but one of its big wins is definitely its single-focus nature. Since you can’t do many things with it, it is perfect for staying focused. I can keep a note open and keep working on it virtually forever. If I close my reMarkable and open it again, it will instantly bring me back to my note. Opening the iPad, on the other hand, is like going through a casino, trying your best not to get tempted to play.
So, the key to staying productive on the iPad is to narrow the focus to a single app of choice without being able to access the rest. Virtually, lock yourself out of the rest.
Thankfully, iPadOS happens to offer just the right feature for that. Sadly, it has been cleverly hidden among its numerous accessibility features and is named with the cryptic name “Guided Access.”

Enabling the option will allow you to lock your focus to a single application of your choice, at all times. The first activation requires setting up a passcode. The point of this passcode is that once you are in a Guided Access session, only the person who knows it can exit the session. I assume that in the simplest case, this will be the same person setting up the session, but it could be virtually anyone. For example, a parent setting up a study session for their child, or a market researcher, handing out a survey to random people on the street. Or, you could ask your partner or friend to set one up for you, if you don’t trust yourself to get distracted. The important thing is to remember that this passcode does not necessarily have to be the one you use to protect your iPad. It can be, but you can also use a totally different one - the important thing is to remember it, otherwise, you won’t be able to get out.
Once you have it set up, entering a “Guided Access” session is as simple as opening the app you want to restrict yourself to, and pressing the top button (the one you use to turn on the iPad) three times. While you are in a session, this will be the only app you can open, which makes it perfect for that period of total concentration we all look forward to.
I must mention that a Guided Session opens up the iPad to outside access. There is no longer any access locking on the home screen, so be careful when you leave your device unattended for a long period of time. The upside to that is that the access to your work is nearly instantaneous. There is no waiting for face detection to open up, no passcodes to enter, and best of all, you don’t have to go through the “app casino” to find what you are working on. This part, I absolutely love.
I tried coming up with decent screenshots or screen recordings to demonstrate what a Guided Access session looks like, but Apple seems to restrict all outside operations, except working with the one app you have chosen. That is why I am sharing this detailed instruction on setting up and using Guided Access from Apple itself.
Now, as for what app you use in a Guided Access session, that is totally up to you. I personally use Nebo, as I find it fantastic and seamless when I want to mix handwriting and diagrams with typed text. Plus, the handwriting-to-text conversion is just beautiful. And, in case you have been asking yourself, no, this post has not been sponsored by the creators of Nebo; I just happen to be a happy customer. For the sake of keeping plain and simple, you might as well use Apple Notes, Pages, Numbers, or any other app of choice.
Nebo
Create beautiful notes and professional documents by hand, sketch ideas on a limitless canvas and annotate PDFs. Powered by the world's best AI handwriting recognition.
Exiting a Guided Access session works the same way - press the top button three times, and you will be presented with an option to end the session. To do that, you need to enter the passcode again. Again, this may or may not be the same one you used when setting up the iPad. This is important to note, so please, if they differ, make sure to keep that in mind.
Troubleshooting #
Occasionally, Guided Access may refuse to turn on. In this case, you must be already inside the app you are going to work with. If you are on the Home screen, for example, open the app, and then try pressing the top button three times again. Of course, if none of that works, a good old stopping and starting of your iPad is guaranteed to make Guided Access work again.
I hope this has been helpful. If you want to share any feedback with me, you can do it using the links below. If you really, really enjoyed my content, you can also support my work by getting me a steaming cup of coffee. Your help will be hugely appreciated.
Thanks, and until next time!
Want to explore instead? Fly with the time capsule 🛸
You may also find these interesting

The Perfect Knowledge Assistant That Does Not Exist
But it totally could, if one manages to put these few points together.
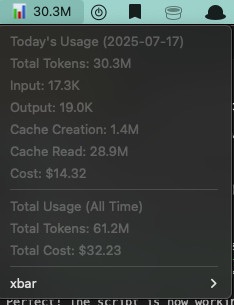
Display your Claude Code Token Usage on Your Mac's Toolbar
A simple Python script and xbar setup to monitor Claude Code token usage directly in your macOS toolbar.

How to Fix Stuck iCloud Syncing on macOS - Part 2
What to do when your Mac won’t sync important files to iCloud. A deeper investigation.
How to Fix Stuck iCloud Syncing on macOS
What to do when your Mac won’t sync important files to iCloud.

Is Swift Playgrounds the Future of Apple App Development?
Is this the beginning of the end of Xcode?